Uncategorized

Uncategorized

Meet Photoshop’s New Adjustment Presets

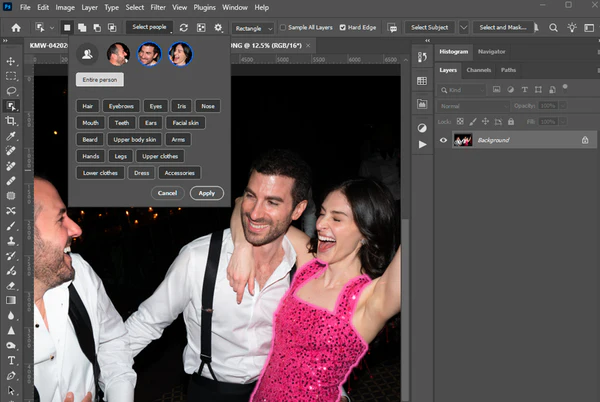
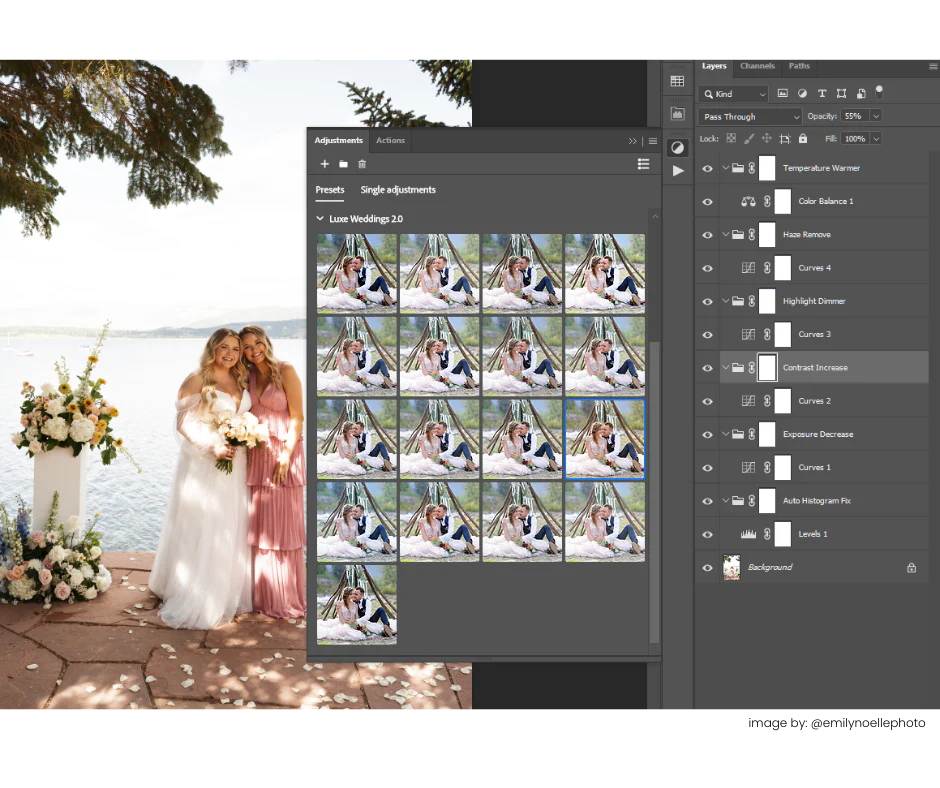
Photoshop is now more approachable than ever! Between the super helpful contextual toolbar and the feedback-based optimization of latest features, there is no better time to learn the software or update your workflow!  You may be familiar with Photoshop adjustments, a method by which you can modify the color, tone, and appearance of your image in Photoshop utilizing non-destructive layers over your images. The traditional adjustment options involve single adjustments: Adjustment layers created from each of these adjustment options can be easily stacked, tweaked and strength adjusted at any stage, and changes can be individually masked to localized zones. However, for learners, determining which adjustment (or combination of adjustments) to select and how to tweak those to affect desired results can be nothing short of daunting.  Enter Adjustment presets! Adjustment Presets are pre-configured complex edits featuring these adjustments saved as filter-like shortcuts for the fastest PS workflow option yet! What’s new? In the latest subscription versions of Photoshop, Adobe has updated the Adjustment window (Window > Adjustments) UI with a focus on optimized use of custom adjustment presets. Adjustment presets are tools and editing sequences designed to function like hover-to-preview, click-to-apply presets (like in Lightroom) but applied directly from the PS workspace as non-destructive layers! You can view and apply saved or imported presets in Thumbnail or List View from the Adjustment Presets Tab:  New for Luxes Actions 2.0! Our Luxe Actions 2.0 collections, starting with the all-new Luxes Weddings 2.0, will now feature these quick-click Adjustment Presets – prep ready-for-action images in just a few quick clicks! Skip plug-ins, pop-ups, ACR, and complex edit-betweens and unlock pro edits without leaving the primary Photoshop workspace!  Our PS presets are offered in .psap format for double-click install directly into the Adjustments window of the latest versions of Photoshop. Each tool is dialed in to make specific changes to an image and based on our traditional actions workflow toolkit. Each adjustment preset is tuned to task, pairing our professional experience with real user feedback for trusted results. While they apply like presets, the applied changes appear in your layers just like actions! They can be stacked, masked to specific zones, adjusted and blended to correct and for ultimate pixel-level control and pro-level dynamic edits!

Uncategorized

Learn with Luxe: Photoshop Tips & Tricks – Select Details!

Have you updated yet? For version 26.6 Adobe just moved the most exciting feature out of beta and Select Details is here for Photoshop*! Follow along as we demonstrate how to use this latest AI-powered selection update to make quick work of cleanly masking super-localized changes with our Luxe Weddings 2.0 Actions: The Photoshop Select Details feature moves beyond Subject, Background, and Sky selection, now including Select People: Hair, Eyebrows, Eyes, Nose, Mouth, Teeth, Ears, Facial Skin, Beard, Arms, Upper Clothes, Accessories, etc. Moving even beyond the current capability of Lightroom’s AI-powered People selection, these new selection options seemingly go as granular as what your image contains and can be applied exclusively to a single person out of a group! This new selection method introduces ease and speed for localized corrections, whether you are new to Photoshop or just looking for a way to supercharge your PS actions workflow! As demonstrated in the video above, here’s how we like to use this new feature to make quick work of masking when editing with actions: ✓ Apply an action  ✓ Click over to your background layer (Object Selection cannot detect for people if on your masking/action layer) ✓ Select the Object Selection tool from the Tools panel.  ✓ Select People from the options bar. ✓ Choose the thumbnail of the desired subject. Select the Entire person or their specific attributes like hair, eyes, and clothes, and click “Apply” to make the selection. ✓ Click back to the layer mask for the action you applied in step 1! ✓ Click on the paint bucket in the contextual toolbar and select “White” or “Grey 50%” for a black layer mask, or “Black” or “Grey 50%” for a white layer mask. With tools like these, there’s no better time to learn Photoshop and give actions a try!

Uncategorized

Luxe Sports User Feature: Donna Schreckengost

What a brilliant season we’ve had so far! As we wind down our Summer of Luxes event, we are excited to highlight an inspiring photographer and Luxes Sports presets user, Donna Schreckengost. When we saw some of her captures it was instant nostalgic joy and we reached out immediately to learn more! Her dynamic sports images are timeless and engaging, and we are so excited to share them with you. Meet Donna “I retired from healthcare management in 2024 after 40 years of working 60+ hours per week.  I began shooting my sons (2011) when they wrestled in high school and from there parents asked me to shoot portraits and action shots of their kid’s sports, senior portraits, and weddings.  I am self taught and love learning how to shoot new genres of photography.  The photos I’m sending are my 1st attempt at dynamic sports photography. My husband and I moved to our very small lake house in 2022 to be close to our oldest son  who blessed us with a beautiful granddaughter in June of 2022.  We’ve spent the past 17 months renovating and adding on to our small home.  One of the additions is a studio over the garage to allow me to focus on establishing myself as a full-time photographer.  I’ve been in limbo due to living in the house while under construction.  I’m excited it is almost complete and I can begin building my business/brand.” Wherever you are in your photography journey, we hope you’re as inspired as we are to get out there and try something new! She’s obviously a talented photographer, and we think she knocked this “1st attempt” out of the park!  Let’s see Her Luxe Sports Edits! Donna told us, “The Luxe Lens Sports presets are a lifesaver!!!” and shared some great examples of her work with edits using the collection. “This photo is edited with “Electrifying Contrast”.  It was basically one click with minor exposure edits.  The client loved it!” “I used the “Gritty Portrait” preset on this image.  The preset brought the image to life and gave it the perfect vibe.”  “I used the “High Intensity” preset with minor adjustments.” “I used the “Driving Clarity” preset with minor adjustments to exposure.” We’re so honored to be a part of her workflow! As always, we are deeply thankful for and inspired by our users.

Shopping Cart
New! ✨ Luxes Lens Overlay LR Presets brings your favorite Luxes Lens overlays to Lightroom!
This is default text for notification bar